Showing posts with label crafts. Show all posts

Sunday, September 13, 2020

I am Unique! Let's Celebrate!


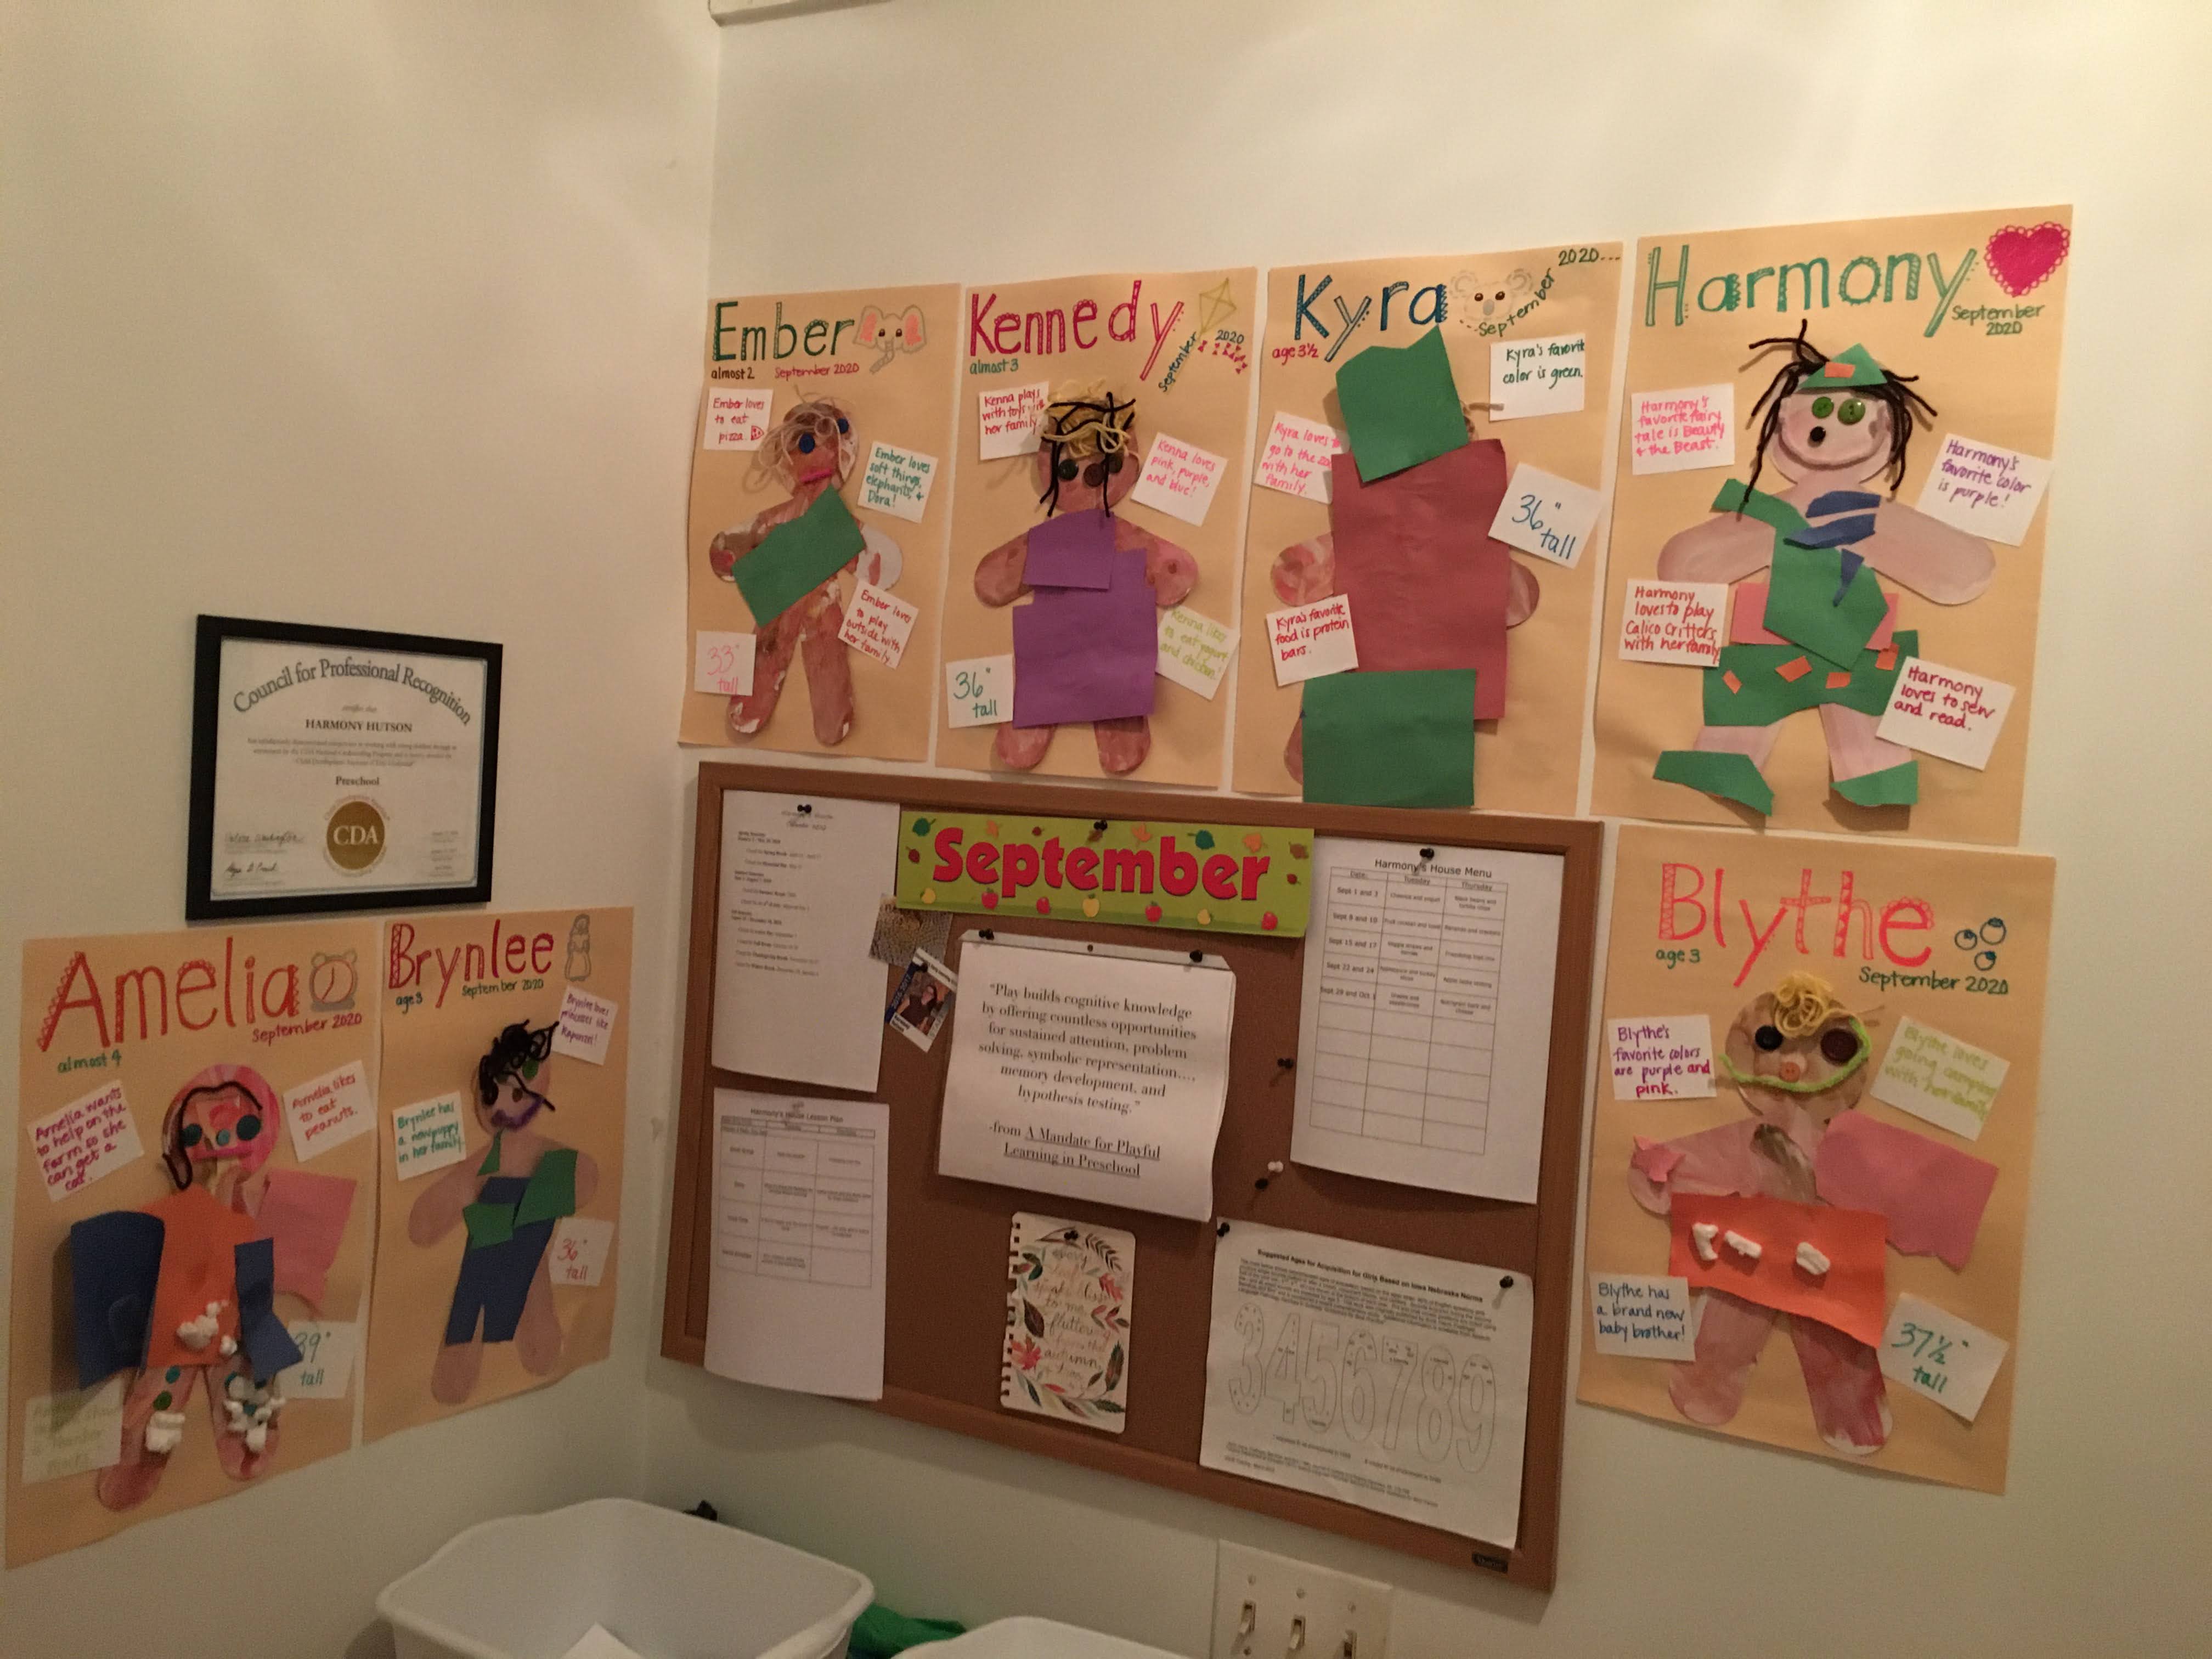
We have worked for a few weeks now to create these likenesses of ourselves, and celebrate all the wonderful ways that we are individually different.


The first step in this project was to look at the "Shades of People," to understand that people aren't really different colors like red, blue, or green... but that we are different shades.  We each started with a blank body cutout, and a palate of brown, white, red, and yellow paint.  


The children were challenged to mix the colors with brown to find the shade that matched their own skin color.


The following week, we looked at each other's faces.  While we all have eyes, noses, and hair, our individual features are very different.  We selected eye colors and sizes from blue, green, and brown buttons.  The children decided if they wanted to add noses or mouths from the art materials.  They also selected hair from yellow, brown, tan, or black yarn.


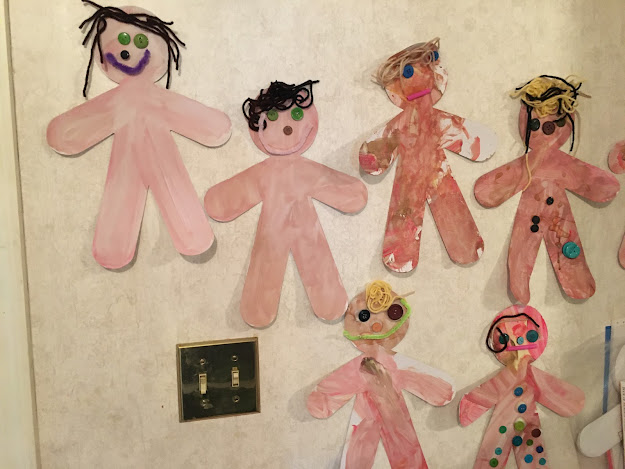
The final week we cut out clothes from colored paper.  We designed our own outfits.  Everyone enjoys different colors and styles.  


This is the culmination of our month-long study of "Self."  Each child has a poster with their art and interests surrounding our Parent Board.  Truly, there is MUCH to appreciate about each child, and how much each child brings to Harmony's House.

Saturday, July 18, 2020

Tips for Tie-Dyeing with Preschoolers


Summer isn't summer at Harmony's House without making new tie-dye t-shirts.  :)  We did this project inside this year with four children ages 20 months to 3 1/2 years.  It sounds like a recipe for disaster, or at least a huge mess!  But it wasn't.  Ms. Harmony did a few things to prepare for the activity that made this potential mess into an easy-breezy-totally-fun project!


Tip 1:  cover the entire table with trash bags or cheap dollar tree table clothes, including using packing tape to close the seams of overlapping edges.

Tip 2: show the children options for the t-shirt designs in advance and ask them to choose one that they like: swirl, stripes, bulls-eye, etc.

Tip 3:  Prep the shirts according to the children's preference.  Do a cold rinse and spin in the washing machine.  Scrunch, roll, shape, etc. the shirt and apply the rubber bands.  Place the damp shirt in a small ziplock bag with the child's name on it.


Tip 4:  Choose three or four colors of dye and make them up before the activity.  Estimate the amount of dye you will need, but have an extra bottle or two on hand just in case you run out mid-project.

Tip 5: When leading the activity, only work on one shirt at a time.  Usually the other children enjoy watching the dyeing process, but they can go play elsewhere until it is their turn to dye their shirt.

Tip 6:  Lay a small sheet of saran wrap under the shirt before allowing the child to squirt the dye on the segments of the shirt.  After each section has been dyed, wrap the saran wrap around the shirt and put it back in the ziplock bag.  Send the bag home with instructions for the parents on how to wash/care for the shirt.


Have so much fun seeing how everyone's shirts the following school day!

Sunday, February 16, 2020

Celebrating Heart Day!


We did a little bit of art... cookie cutter stamping and LOTS of stickers courtesy of J. Sumner!  (Thank you!)


We mended some "broken hearts" by matching quantity with number and completing the puzzles.


We enjoyed YUMMY sugar cookies with our own decorating designs.


Toppings of choice were strawberries, M&Ms, sprinkles, and frosting.


We rolled out play-doh hearts for days!


We found letter hearts hiding in Valentine's crinkly paper and rose petals.


Happy Valentine's Day!

Sunday, October 27, 2019

Spooky Sensory Bottles


We've currently have three sensory bottles to play with and these are so cool!

This one has purple bands, a bit of orange glitter, plastic bugs, clear glue and water.  Just shake it up and watch the bugs "fly" around dodging the bands.


Next, the green bottle works best if you roll it, rather than shake it.  Instead of glue, it's made with water and oil. Most of the green glitter conglomerates with the oil.  The googly eyes float, so they are inevitably carried by the oil as well which always moves to the top of the bottle.  When the bottle is rolled around, the oil moves like a slimy monster!  And the eyes are ALWAYS watching you!  Boo!


This last bottle is just plain pretty.  :)  Made with equal parts of clear glue and water, the red and gold glitter swirl slowly after being shaken.  The fall colored gems will gently descend when the bottle is at rest.  All in all, it's completely mesmerizing.


Sensory bottles are amazing because they are so unique.  Depending on what you put in them, the results can be so different.  If you haven't tried these yet for your kids or students, don't be afraid to start!  It's almost impossible to go wrong.  :)

Wednesday, October 23, 2019

Teeny Halloweenie Art


Play-doh monsters are the bomb!  We made these cute little guys with googly eyes, fuzzy sticks, and clay.  The children get to form the body and accessorize with eyes and fuzzy sticks however s/he wants to.  You can't go wrong!  The monsters always turn out so cute!  We will dry ours, but you don't have to.


We decorated our small class pumpkin today by pouring cups of paint over the pumpkin.  The dripping and splatter effect was really unique, and fairly mess free!  Very little paint got on small hands or even the table because we used cups for the paint and a covered cookie sheet under the pumpkin.


Sunday, August 11, 2019

Exploring Desert Life


The desert is near and dear for Ms. Harmony as she grew up in the Sonoran Desert of Arizona!  She shared just a bit of this experience with the school friends in late July this year.

In studying reptiles, we talked about these animals having scaly bodies like fish... but they are different because they don't have any gills!  They don't live in the water.  We painted on the bubble wrap-covered easel and stamped papers shaped like snakes on the wet paint.


Friend "Hammer" has been wanting to do Marble Works all summer!  We made snake-slides for our marbles and it was so neat to send marbles down these twists and turns.  The school friends were given a few pieces of track at a time and asked to connect them and see how the marbles moved through the channels.  They worked through the trial and error process of learning about gravity, obstacles, gaps, slopes, and more.


In the desert, there are animals that can be hot and thirsty because it doesn't rain very much.  Saguaro cacti are plants that are ONLY found in the Sonoran Desert of the southwest.  They are covered in prickly spines to protect them from hungry animals, but there are some animals who build homes in the cacti anyways.  :)  After reading some books with real pictures of saguaros, prickly pear, and organ pipe cacti, we used play-doh and half-toothpicks to make our own cacti.  Together, it made an adorable cactus garden.


Friday, August 9, 2019

Bippidy Boppidy Boo


Friend "Kangaroo" has been begging all summer to make a new "magic wand" because her old one broke.  During the last week of school... we did it!  First we painted bubble wrap, stamped our papers on it, and added glitter.  When we came back to the project later in the day, the school friends decided what shape they wanted their wands to be.  We taped a dowel rod inside and wallah, a new magically fantastical wand!

Next we used these in Circle Time where we read one version of the Cinderella story.  The fairy godmother is depicted as having a wand with a star.  When we got to the point in the story where the fairy godmother uses her wand to transform pumpkins into coaches, mice into horses, a toad into a driver, etc. the children helped too by completing the rhyme!

For example, Ms. Harmony would say: "Bippidy boppidy boach, I turn this pumpkin into a ...." and the children would respond "Coach!"  We all waved our wands while working our magic.  ;)  Soon we helped Cinderella get to the ball, return home safely, try on shoes, and marry a prince.

This art/literacy combo activity was definitely a "happily-ever-after" choice for this group!


Tuesday, July 2, 2019

Happy Independence Day!


One of the funnest parts (for some people) of the 4th of July is the fireworks!  We had a great time making these fireworks on our paper WITH sound effects.  ;)


We also read a book "The Star Spangled Banner" that depicted our country's flag, current traditions, and paintings of early Revolutionary war time soldiers to the lyrics of the national anthem.  We noticed the colors of the flag and briefly talked about how seeing the flag can make us feel proud of our country.  We each used a red, blue, or white bandanna to wave and made our own parade for Circle Time.  "Yankee Doodle" makes for great marching!


What's with the "Names?"

For new readers of the blog, this post is an explanation of the "names" Ms. Harmony uses when she writes about the school happe...

Read More!